AWT MouseAdapter Class
Introduction
The class MouseAdapter is an abstract (adapter) class for receiving mouse events. All methods of this class are empty. This class is convenience class for creating listener objects.Class declaration
Following is the declaration for java.awt.event.MouseAdapter class:public abstract class MouseAdapter extends Object implements MouseListener, MouseWheelListener, MouseMotionListener
Class constructors
| S.N. | Constructor & Description |
|---|---|
| 1 | MouseAdapter() |
Class methods
| S.N. | Method & Description |
|---|---|
| 1 | void mouseClicked(MouseEvent e) Invoked when the mouse button has been clicked (pressed and released) on a component. |
| 2 | void mouseDragged(MouseEvent e) Invoked when a mouse button is pressed on a component and then dragged. |
| 3 | void mouseEntered(MouseEvent e) Invoked when the mouse enters a component. |
| 4 | void mouseExited(MouseEvent e) Invoked when the mouse exits a component. |
| 5 | void mouseMoved(MouseEvent e) Invoked when the mouse cursor has been moved onto a component but no buttons have been pushed. |
| 6 | void mousePressed(MouseEvent e) Invoked when a mouse button has been pressed on a component. |
| 7 | void mouseReleased(MouseEvent e) Invoked when a mouse button has been released on a component. |
| 8 | void mouseWheelMoved(MouseWheelEvent e) Invoked when the mouse wheel is rotated. |
Methods inherited
This class inherits methods from the following classes:- java.lang.Object
MouseAdapter Example
Create the following java program using any editor of your choice in say D:/ > AWT > com > tutorialspoint > gui >AwtAdapterDemo.java
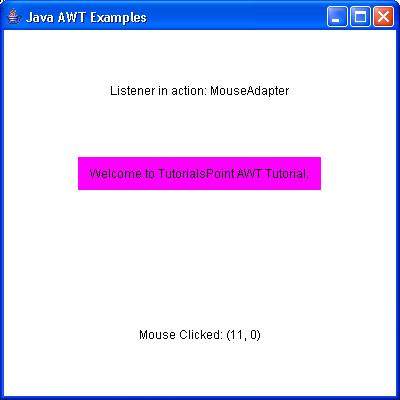
package com.tutorialspoint.gui;

import java.awt.*;
import java.awt.event.*;

public class AwtAdapterDemo {
   private Frame mainFrame;
   private Label headerLabel;
   private Label statusLabel;
   private Panel controlPanel;

   public AwtAdapterDemo(){
      prepareGUI();
   }

   public static void main(String[] args){
      AwtAdapterDemo  awtAdapterDemo = new AwtAdapterDemo();
      awtAdapterDemo.showMouseAdapterDemo();
   }

   private void prepareGUI(){
      mainFrame = new Frame("Java AWT Examples");
      mainFrame.setSize(400,400);
      mainFrame.setLayout(new GridLayout(3, 1));
      mainFrame.addWindowListener(new WindowAdapter() {
         public void windowClosing(WindowEvent windowEvent){
            System.exit(0);
         }
      });
      headerLabel = new Label();
      headerLabel.setAlignment(Label.CENTER);
      statusLabel = new Label();
      statusLabel.setAlignment(Label.CENTER);
      statusLabel.setSize(350,100);

      controlPanel = new Panel();
      controlPanel.setLayout(new FlowLayout());

      mainFrame.add(headerLabel);
      mainFrame.add(controlPanel);
      mainFrame.add(statusLabel);
      mainFrame.setVisible(true);
   }

   private void showMouseAdapterDemo(){
      headerLabel.setText("Listener in action: MouseAdapter");

      Panel panel = new Panel();
      panel.setBackground(Color.magenta);
      panel.setLayout(new FlowLayout());
      panel.addMouseListener(new MouseAdapter(){
         public void mouseClicked(MouseEvent e) {
            statusLabel.setText("Mouse Clicked: ("
            +e.getX()+", "+e.getY() +")");
         }
      });

      Label msglabel = new Label();
      msglabel.setAlignment(Label.CENTER);
      msglabel.setText("Welcome to TutorialsPoint AWT Tutorial.");

      msglabel.addMouseListener(new MouseAdapter(){
         public void mouseClicked(MouseEvent e) {
            statusLabel.setText("Mouse Clicked: ("
            +e.getX()+", "+e.getY() +")");
         }
      });
      panel.add(msglabel);
      controlPanel.add(panel);
      mainFrame.setVisible(true);
   }
}
Compile the program using command prompt. Go to D:/ > AWT and type the following command.
D:\AWT>javac com\tutorialspoint\gui\AwtAdapterDemo.javaIf no error comes that means compilation is successful. Run the program using following command.
D:\AWT>java com.tutorialspoint.gui.AwtAdapterDemoVerify the following output
AWT MouseMotionAdapter Class
Introduction
The class MouseMotionAdapter is an abstract (adapter) class for receiving mouse motion events. All methods of this class are empty. This class is convenience class for creating listener objects.Class declaration
Following is the declaration for java.awt.event.MouseMotionAdapter class:public abstract class MouseMotionAdapter extends Object implements MouseMotionListener
Class constructors
| S.N. | Constructor & Description |
|---|---|
| 1 | MouseMotionAdapter() |
Class methods
| S.N. | Method & Description |
|---|---|
| 1 | void mouseDragged(MouseEvent e) Invoked when a mouse button is pressed on a component and then dragged. |
| 2 | void mouseMoved(MouseEvent e) Invoked when the mouse cursor has been moved onto a component but no buttons have been pushed. |
Methods inherited
This class inherits methods from the following classes:- java.lang.Object
MouseMotionAdapter Example
Create the following java program using any editor of your choice in say D:/ > AWT > com > tutorialspoint > gui >AwtAdapterDemo.java
package com.tutorialspoint.gui;

import java.awt.*;
import java.awt.event.*;

public class AwtAdapterDemo {
   private Frame mainFrame;
   private Label headerLabel;
   private Label statusLabel;
   private Panel controlPanel;

   public AwtAdapterDemo(){
      prepareGUI();
   }

   public static void main(String[] args){
      AwtAdapterDemo  awtAdapterDemo = new AwtAdapterDemo();
      awtAdapterDemo.showMouseMotionAdapterDemo();
   }

   private void prepareGUI(){
      mainFrame = new Frame("Java AWT Examples");
      mainFrame.setSize(400,400);
      mainFrame.setLayout(new GridLayout(3, 1));
      mainFrame.addWindowListener(new WindowAdapter() {
         public void windowClosing(WindowEvent windowEvent){
            System.exit(0);
         }
      });
      headerLabel = new Label();
      headerLabel.setAlignment(Label.CENTER);
      statusLabel = new Label();
      statusLabel.setAlignment(Label.CENTER);
      statusLabel.setSize(350,100);

      controlPanel = new Panel();
      controlPanel.setLayout(new FlowLayout());

      mainFrame.add(headerLabel);
      mainFrame.add(controlPanel);
      mainFrame.add(statusLabel);
      mainFrame.setVisible(true);
   }

   private void showMouseMotionAdapterDemo(){
      headerLabel.setText("Listener in action: MouseMotionAdapter");

      Panel panel = new Panel();
      panel.setBackground(Color.magenta);
      panel.setLayout(new FlowLayout());
      panel.addMouseMotionListener(new MouseMotionAdapter(){
         public void mouseMoved(MouseEvent e) {
            statusLabel.setText("Mouse Moved: ("+e.getX()+", "+e.getY() +")");
         }
      });

      Label msglabel = new Label();
      msglabel.setAlignment(Label.CENTER);
      msglabel.setText("Welcome to TutorialsPoint AWT Tutorial.");
      panel.add(msglabel);

      controlPanel.add(panel);

      mainFrame.setVisible(true);
   }
}
Compile the program using command prompt. Go to D:/ > AWT and type the following command.
D:\AWT>javac com\tutorialspoint\gui\AwtAdapterDemo.javaIf no error comes that means compilation is successful. Run the program using following command.
D:\AWT>java com.tutorialspoint.gui.AwtAdapterDemoVerify the following output

AWT WindowAdapter Class
Introduction
The class WindowAdapter is an abstract (adapter) class for receiving window events. All methods of this class are empty. This class is convenience class for creating listener objects.Class declaration
Following is the declaration for java.awt.event.WindowAdapter class:public abstract class WindowAdapter extends Object implements WindowListener, WindowStateListener, WindowFocusListener
Class constructors
| S.N. | Constructor & Description |
|---|---|
| 1 | WindowAdapter() |
Class methods
| S.N. | Method & Description |
|---|---|
| 1 | void windowActivated(WindowEvent e) Invoked when a window is activated. |
| 2 | void windowClosed(WindowEvent e) Invoked when a window has been closed. |
| 3 | void windowClosing(WindowEvent e) Invoked when a window is in the process of being closed. |
| 4 | void windowDeactivated(WindowEvent e) Invoked when a window is de-activated. |
| 5 | void windowDeiconified(WindowEvent e) Invoked when a window is de-iconified. |
| 6 | void windowGainedFocus(WindowEvent e) Invoked when the Window is set to be the focused Window, which means that the Window, or one of its subcomponents, will receive keyboard events. |
| 7 | void windowIconified(WindowEvent e) Invoked when a window is iconified. |
| 8 | void windowLostFocus(WindowEvent e) Invoked when the Window is no longer the focused Window, which means that keyboard events will no longer be delivered to the Window or any of its subcomponents. |
| 9 | void windowOpened(WindowEvent e) Invoked when a window has been opened. |
| 10 | void windowStateChanged(WindowEvent e) Invoked when a window state is changed. |
Methods inherited
This class inherits methods from the following classes:- java.lang.Object
WindowAdapter Example
Create the following java program using any editor of your choice in say D:/ > AWT > com > tutorialspoint > gui >AwtAdapterDemo.java
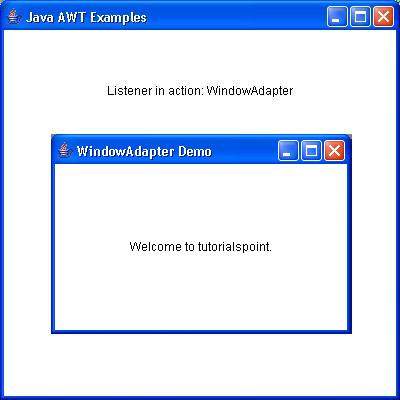
package com.tutorialspoint.gui;

import java.awt.*;
import java.awt.event.*;

public class AwtAdapterDemo {
   private Frame mainFrame;
   private Label headerLabel;
   private Label statusLabel;
   private Panel controlPanel;

   public AwtAdapterDemo(){
      prepareGUI();
   }

   public static void main(String[] args){
      AwtAdapterDemo  awtAdapterDemo = new AwtAdapterDemo();
      awtAdapterDemo.showWindowAdapterDemo();
   }

   private void prepareGUI(){
      mainFrame = new Frame("Java AWT Examples");
      mainFrame.setSize(400,400);
      mainFrame.setLayout(new GridLayout(3, 1));
      mainFrame.addWindowListener(new WindowAdapter() {
         public void windowClosing(WindowEvent windowEvent){
            System.exit(0);
         }
      });
      headerLabel = new Label();
      headerLabel.setAlignment(Label.CENTER);
      statusLabel = new Label();
      statusLabel.setAlignment(Label.CENTER);
      statusLabel.setSize(350,100);

      controlPanel = new Panel();
      controlPanel.setLayout(new FlowLayout());

      mainFrame.add(headerLabel);
      mainFrame.add(controlPanel);
      mainFrame.add(statusLabel);
      mainFrame.setVisible(true);
   }

   private void showWindowAdapterDemo(){
      headerLabel.setText("Listener in action: WindowAdapter");

      Button okButton = new Button("OK");

      final Frame aboutFrame = new Frame();
      aboutFrame.setSize(300,200);;
      aboutFrame.setTitle("WindowAdapter Demo");
      aboutFrame.addWindowListener(new WindowAdapter() {
            public void windowClosing(WindowEvent windowEvent){
               aboutFrame.dispose();
         }
      });
      Label msgLabel = new Label("Welcome to tutorialspoint.");
      msgLabel.setAlignment(Label.CENTER);
      msgLabel.setSize(100,100);
      aboutFrame.add(msgLabel);
      aboutFrame.setVisible(true);
   }
}
Compile the program using command prompt. Go to D:/ > AWT and type the following command.
D:\AWT>javac com\tutorialspoint\gui\AwtAdapterDemo.javaIf no error comes that means compilation is successful. Run the program using following command.
D:\AWT>java com.tutorialspoint.gui.AwtAdapterDemoVerify the following output
AWT Layouts
Introduction
Layout means the arrangement of components within the container. In other way we can say that placing the components at a particular position within the container. The task of layouting the controls is done automatically by the Layout Manager.Layout Manager
The layout manager automatically positions all the components within the container. If we do not use layout manager then also the components are positioned by the default layout manager. It is possible to layout the controls by hand but it becomes very difficult because of the following two reasons.- It is very tedious to handle a large number of controls within the container.
- Oftenly the width and height information of a component is not given when we need to arrange them.
The layout manager is associated with every Container object. Each layout manager is an object of the class that implements the LayoutManager interface.
Following are the interfaces and classes defining functionalities of Layout Managers.
AWT LayoutManager Interface
Introduction
The interfaceLayoutManager is used to define the interface for classes that know how to lay out Containers.Class declaration
Following is the declaration for java.awt.LayoutManager interface:public interface LayoutManager
Interface methods
| S.N. | Method & Description |
|---|---|
| 1 | void addLayoutComponent(String name, Component comp) If the layout manager uses a per-component string, adds the component comp to the layout, associating it with the string specified by name. |
| 2 | void layoutContainer(Container parent) Lays out the specified container. |
| 3 | Dimension minimumLayoutSize(Container parent) Calculates the minimum size dimensions for the specified container, given the components it contains. |
| 4 | Dimension preferredLayoutSize(Container parent) Calculates the preferred size dimensions for the specified container, given the components it contains. |
| 5 | void removeLayoutComponent(Component comp) Removes the specified component from the layout. |
AWT LayoutManager2 Interface
Introduction
The interfaceLayoutManger is used to define the interface for classes that know how to lay out Containers based on a layout constraints object.Class declaration
Following is the declaration for java.awt.LayoutManager2 interface:public interface LayoutManger2 extends LayoutManager
Interface methods
| S.N. | Method & Description |
|---|---|
| 1 | void addLayoutComponent(Component comp, Object constraints) Adds the specified component to the layout, using the specified constraint object. |
| 2 | float getLayoutAlignmentX(Container target) Returns the alignment along the x axis. |
| 3 | float getLayoutAlignmentY(Container target) Returns the alignment along the y axis. |
| 4 | void invalidateLayout(Container target) Invalidates the layout, indicating that if the layout manager has cached information it should be discarded. |
| 5 | Dimension maximumLayoutSize(Container target) Calculates the maximum size dimensions for the specified container, given the components it contains. |
AWT BorderLayout Class
Introduction
The class BorderLayout arranges the components to fit in the five regions: east, west, north, south and center. Each region is can contain only one component and each component in each region is identified by the corresponding constant NORTH, SOUTH, EAST, WEST, and CENTER.Class declaration
Following is the declaration for java.awt.BorderLayout class:public class BorderLayout extends Object implements LayoutManager2, Serializable
Field
Following are the fields for java.awt.BorderLayout class:- static String AFTER_LAST_LINE -- Synonym for PAGE_END.
- static String AFTER_LINE_ENDS -- Synonym for LINE_END.
- static String BEFORE_FIRST_LINE -- Synonym for PAGE_START.
- static String BEFORE_LINE_BEGINS -- Synonym for LINE_START.
- static String CENTER -- The center layout constraint (middle of container).
- static String EAST -- The east layout constraint (right side of container).
- static String LINE_END -- The component goes at the end of the line direction for the layout.
- static String LINE_START -- The component goes at the beginning of the line direction for the layout.
- static String NORTH -- The north layout constraint (top of container).
- static String PAGE_END -- The component comes after the last line of the layout's content.
- static String PAGE_START -- The component comes before the first line of the layout's content.
- static String SOUTH -- The south layout constraint (bottom of container).
- static String WEST -- The west layout constraint (left side of container).
Class constructors
| S.N. | Constructor & Description |
|---|---|
| 1 | BorderLayout() Constructs a new border layout with no gaps between components. |
| 2 | BorderLayout(int hgap, int vgap) Constructs a border layout with the specified gaps between components. |
Class methods
| S.N. | Method & Description |
|---|---|
| 1 | void addLayoutComponent(Component comp, Object constraints) Adds the specified component to the layout, using the specified constraint object. |
| 2 | void addLayoutComponent(String name, Component comp) If the layout manager uses a per-component string, adds the component comp to the layout, associating it with the string specified by name. |
| 3 | int getHgap() Returns the horizontal gap between components. |
| 4 | float getLayoutAlignmentX(Container parent) Returns the alignment along the x axis. |
| 5 | float getLayoutAlignmentY(Container parent) Returns the alignment along the y axis. |
| 6 | int getVgap() Returns the vertical gap between components. |
| 7 | void invalidateLayout(Container target) Invalidates the layout, indicating that if the layout manager has cached information it should be discarded. |
| 8 | void layoutContainer(Container target) |
| 9 | Dimension maximumLayoutSize(Container target) Returns the maximum dimensions for this layout given the components in the specified target container. |
| 10 | Dimension minimumLayoutSize(Container target) Determines the minimum size of the target container using this layout manager. |
| 11 | Dimension preferredLayoutSize(Container target) Determines the preferred size of the target container using this layout manager, based on the components in the container. |
| 12 | void removeLayoutComponent(Component comp) Removes the specified component from this border layout. |
| 13 | void setHgap(int hgap) Sets the horizontal gap between components. |
| 14 | void setVgap(int vgap) Sets the vertical gap between components. |
| 15 | String toString() Returns a string representation of the state of this border layout. |
Methods inherited
This class inherits methods from the following classes:- java.lang.Object
BorderLayout Example
Create the following java program using any editor of your choice in say D:/ > AWT > com > tutorialspoint > gui >AwtLayoutDemo.java
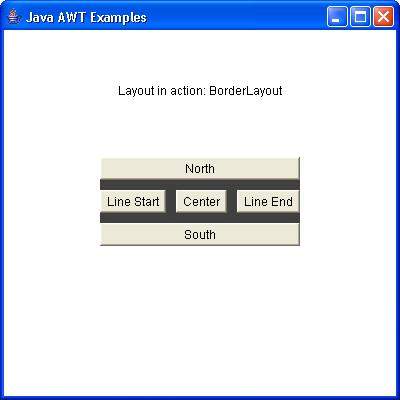
package com.tutorialspoint.gui;

import java.awt.*;
import java.awt.event.*;

public class AwtLayoutDemo {
   private Frame mainFrame;
   private Label headerLabel;
   private Label statusLabel;
   private Panel controlPanel;
   private Label msglabel;

   public AwtLayoutDemo(){
      prepareGUI();
   }

   public static void main(String[] args){
      AwtLayoutDemo  awtLayoutDemo = new AwtLayoutDemo();
      awtLayoutDemo.showBorderLayoutDemo();
   }

   private void prepareGUI(){
      mainFrame = new Frame("Java AWT Examples");
      mainFrame.setSize(400,400);
      mainFrame.setLayout(new GridLayout(3, 1));
      mainFrame.addWindowListener(new WindowAdapter() {
         public void windowClosing(WindowEvent windowEvent){
            System.exit(0);
         }
      });
      headerLabel = new Label();
      headerLabel.setAlignment(Label.CENTER);
      statusLabel = new Label();
      statusLabel.setAlignment(Label.CENTER);
      statusLabel.setSize(350,100);

      msglabel = new Label();
      msglabel.setAlignment(Label.CENTER);
      msglabel.setText("Welcome to TutorialsPoint AWT Tutorial.");

      controlPanel = new Panel();
      controlPanel.setLayout(new FlowLayout());

      mainFrame.add(headerLabel);
      mainFrame.add(controlPanel);
      mainFrame.add(statusLabel);
      mainFrame.setVisible(true);
   }

   private void showBorderLayoutDemo(){
      headerLabel.setText("Layout in action: BorderLayout");

      Panel panel = new Panel();
      panel.setBackground(Color.darkGray);
      panel.setSize(300,300);
      BorderLayout layout = new BorderLayout();
      layout.setHgap(10);
      layout.setVgap(10);
      panel.setLayout(layout);

      panel.add(new Button("Center"),BorderLayout.CENTER);
      panel.add(new Button("Line Start"),BorderLayout.LINE_START);
      panel.add(new Button("Line End"),BorderLayout.LINE_END);
      panel.add(new Button("East"),BorderLayout.EAST);
      panel.add(new Button("West"),BorderLayout.WEST);
      panel.add(new Button("North"),BorderLayout.NORTH);
      panel.add(new Button("South"),BorderLayout.SOUTH);

      controlPanel.add(panel);

      mainFrame.setVisible(true);
   }
}
Compile the program using command prompt. Go to D:/ > AWT and type the following command.
D:\AWT>javac com\tutorialspoint\gui\AwtlayoutDemo.javaIf no error comes that means compilation is successful. Run the program using following command.
D:\AWT>java com.tutorialspoint.gui.AwtlayoutDemoVerify the following output
AWT CardLayout Class
Introduction
The class CardLayout arranges each component in the container as a card. Only one card is visible at a time, and the container acts as a stack of cards.Class declaration
Following is the declaration for java.awt.CardLayout class:public class CardLayout extends Object implements LayoutManager2, Serializable
Class constructors
| S.N. | Constructor & Description |
|---|---|
| 1 | CardLayout() Creates a new card layout with gaps of size zero. |
| 2 | CardLayout(int hgap, int vgap) Creates a new card layout with the specified horizontal and vertical gaps. |
Class methods
| S.N. | Method & Description |
|---|---|
| 1 | void addLayoutComponent(Component comp, Object constraints) Adds the specified component to this card layout's internal table of names. |
| 2 | void addLayoutComponent(String name, Component comp) If the layout manager uses a per-component string, adds the component comp to the layout, associating it with the string specified by name. |
| 3 | void first(Container parent) Flips to the first card of the container. |
| 4 | int getHgap() Gets the horizontal gap between components. |
| 5 | float getLayoutAlignmentX(Container parent) Returns the alignment along the x axis. |
| 6 | float getLayoutAlignmentY(Container parent) Returns the alignment along the y axis. |
| 7 | int getVgap() Gets the vertical gap between components. |
| 8 | void invalidateLayout(Container target) Invalidates the layout, indicating that if the layout manager has cached information it should be discarded. |
| 9 | void last(Container parent) Flips to the last card of the container. |
| 10 | void layoutContainer(Container parent) Lays out the specified container using this card layout. |
| 11 | Dimension maximumLayoutSize(Container target) Returns the maximum dimensions for this layout given the components in the specified target container. |
| 12 | Dimension minimumLayoutSize(Container parent) Calculates the minimum size for the specified panel. |
| 13 | void next(Container parent) Flips to the next card of the specified container. |
| 14 | Dimension preferredLayoutSize(Container parent) Determines the preferred size of the container argument using this card layout. |
| 15 | void previous(Container parent) Flips to the previous card of the specified container. |
| 16 | void removeLayoutComponent(Component comp) Removes the specified component from the layout. |
| 17 | void setHgap(int hgap) Sets the horizontal gap between components. |
| 18 | void setVgap(int vgap) Sets the vertical gap between components. |
| 19 | void show(Container parent, String name) Flips to the component that was added to this layout with the specified name, using addLayoutComponent. |
| 20 | String toString() Returns a string representation of the state of this card layout. |
Methods inherited
This class inherits methods from the following classes:- java.lang.Object
CardLayout Example
Create the following java program using any editor of your choice in say D:/ > AWT > com > tutorialspoint > gui >AwtLayoutDemo.java
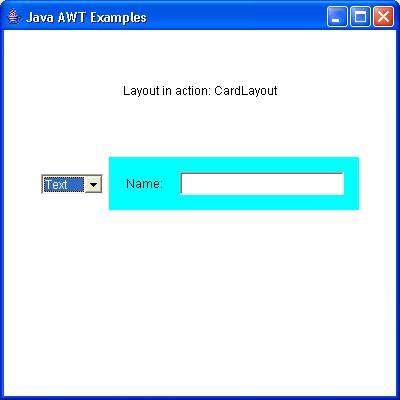
package com.tutorialspoint.gui;

import java.awt.*;
import java.awt.event.*;

public class AwtLayoutDemo {
   private Frame mainFrame;
   private Label headerLabel;
   private Label statusLabel;
   private Panel controlPanel;
   private Label msglabel;

   public AwtLayoutDemo(){
      prepareGUI();
   }

   public static void main(String[] args){
      AwtLayoutDemo  awtLayoutDemo = new AwtLayoutDemo();
      awtLayoutDemo.showCardLayoutDemo();
   }

   private void prepareGUI(){
      mainFrame = new Frame("Java AWT Examples");
      mainFrame.setSize(400,400);
      mainFrame.setLayout(new GridLayout(3, 1));
      mainFrame.addWindowListener(new WindowAdapter() {
         public void windowClosing(WindowEvent windowEvent){
            System.exit(0);
         }
      });
      headerLabel = new Label();
      headerLabel.setAlignment(Label.CENTER);
      statusLabel = new Label();
      statusLabel.setAlignment(Label.CENTER);
      statusLabel.setSize(350,100);

      msglabel = new Label();
      msglabel.setAlignment(Label.CENTER);
      msglabel.setText("Welcome to TutorialsPoint AWT Tutorial.");

      controlPanel = new Panel();
      controlPanel.setLayout(new FlowLayout());

      mainFrame.add(headerLabel);
      mainFrame.add(controlPanel);
      mainFrame.add(statusLabel);
      mainFrame.setVisible(true);
   }

   private void showCardLayoutDemo(){
      headerLabel.setText("Layout in action: CardLayout");

      final Panel panel = new Panel();
      panel.setBackground(Color.CYAN);
      panel.setSize(300,300);

      CardLayout layout = new CardLayout();
      layout.setHgap(10);
      layout.setVgap(10);
      panel.setLayout(layout);

      Panel buttonPanel = new Panel(new FlowLayout());

      buttonPanel.add(new Button("OK"));
      buttonPanel.add(new Button("Cancel"));

      Panel textBoxPanel = new Panel(new FlowLayout());

      textBoxPanel.add(new Label("Name:"));
      textBoxPanel.add(new TextField(20));

      panel.add("Button", buttonPanel);
      panel.add("Text", textBoxPanel);

      Choice choice = new Choice();
      choice.add("Button");
      choice.add("Text");

      choice.addItemListener(new ItemListener() {
         public void itemStateChanged(ItemEvent e) {
            CardLayout cardLayout = (CardLayout)(panel.getLayout());
            cardLayout.show(panel, (String)e.getItem());
         }
      });
      controlPanel.add(choice);
      controlPanel.add(panel);

      mainFrame.setVisible(true);
   }
}
Compile the program using command prompt. Go to D:/ > AWT and type the following command.
D:\AWT>javac com\tutorialspoint\gui\AwtlayoutDemo.javaIf no error comes that means compilation is successful. Run the program using following command.
D:\AWT>java com.tutorialspoint.gui.AwtlayoutDemoVerify the following output
No comments:
Post a Comment